こんにちは。SIOS OSSエバンジェリスト/セキュリティ担当の面 和毅です。
SAML環境のテストのために、SimpleSAMLphpを使って簡易IdP / SPをセットアップしました。SAML環境に関しては引き続き連載致します。今回は「SimpleSAMLphpを用いたIdPのセットアップ」を纏めます。
連載
(SAML第1回) SimpleSAMLphpを使った簡易IdPの作成
(SAML第2回) SimpleSAMLphpを使った簡易SPの作成
(SAML第3回) mod_auth_mellonを使った簡易SPの作成
環境
- OS: CentOS 7.9(最新にyumで更新)
- Apache: 2.4.6-97(最新のものをyumから取得)
- PHP: 7.3.27(remiから取得)
- SimpleSAMLphp: 1.19.0(最新)
- ホスト名:idp.example.net
1. Webサーバ(Apache)+PHPの作成
まず、CentOS 7を使ってWebサーバ+PHP(PHP 7.3以上)が動く状況を作成します。以下、特に注釈がない場合にはrootで作業します。
- CentOS 7上でApacheをインストールします。通常は最小限のパッケージにしたいため、関連する必要なパッケージをそれぞれyumを用いてインストールしますが、ここではIdPのインストールにフォーカスしたいため、思い切って下記の様に「yum group install」で”Basic Web Server”をインストールしてあります。
[root@idp ~]# yum -y groupinstall "Basic Web Server" - PHP7.3をインストールします。CentOS 7上でPHP 7.x をインストールする際には、remiレポジトリを使用します。
[root@idp ~]# yum -y install http://ftp.riken.jp/Linux/remi/enterprise/remi-release-7.rpm [root@idp ~]# yum install --disablerepo=* --enablerepo=epel,remi,remi-safe,remi-php73 php php-mbstring php-xml php-common php-cli - /etc/php.iniで「Dynamic Extensions」に下記を加えます(下記の例では887行目です)
883 ;;;;;;;;;;;;;;;;;;;;;; 884 ; Dynamic Extensions ; 885 ;;;;;;;;;;;;;;;;;;;;;; 886 887 extention=mbstring.so 888 - localeを設定します。
[root@idp ~]# localectl set-locale LANG=ja_JP.utf8 - mod_sslをインストールし、証明書をインストールします。今回は自己証明書を作成して/etc/pki/tls/private/以下にserver.key,server.csrとして作成しました。この辺の手順は、よくある「オレオレ証明書」でのApache(https)セットアップと同じになります。
[root@idp ~]# openssl genrsa -aes128 1024 > /etc/pki/tls/private/server.key [root@idp ~]# openssl req -new -key /etc/pki/tls/private/server.key > /etc/pki/tls/private/server.csr [root@idp ~]# openssl x509 -in /etc/pki/tls/private/server.csr -days 3650 -req -signkey /etc/pki/tls/private/server.key > /etc/pki/tls/private/server.crt - /etc/httpd/conf.d/ssl.confを以下のようにします。
- 自己証明書を使用する
- SIMPLESAMLPHP_CONFIG_DIRを設定する
- Directory /var/www/simplesaml/wwwを設定する
ssl.confの修正点は下記のようになります(下記はdiffの出力結果になります)。
[root@idp conf.d]# diff -Nru ssl.conf.org ssl.conf
--- ssl.conf.org    2021-02-20 10:01:21.313615618 +0900
+++ ssl.conf    2021-02-20 10:01:32.733977001 +0900
@@ -55,9 +55,14 @@
<VirtualHost _default_:443>
+SetEnv SIMPLESAMLPHP_CONFIG_DIR /var/www/simplesaml/config
+
# General setup for the virtual host, inherited from global configuration
#DocumentRoot "/var/www/html"
-#ServerName www.example.com:443
+DocumentRoot "/var/www/simplesaml/www"
+Alias /simplesaml "/var/www/simplesaml/www"
+
+ServerName idp.example.net:443
# Use separate log files for the SSL virtual host; note that LogLevel
# is not inherited from httpd.conf.
@@ -72,7 +77,8 @@
#   SSL Protocol support:
# List the enable protocol levels with which clients will be able to
# connect.  Disable SSLv2 access by default:
-SSLProtocol all -SSLv2 -SSLv3
+#SSLProtocol all -SSLv2 -SSLv3
+SSLProtocol -all +TLSv1.2
#   SSL Cipher Suite:
#   List the ciphers that the client is permitted to negotiate.
@@ -97,14 +103,16 @@
# the certificate is encrypted, then you will be prompted for a
# pass phrase.  Note that a kill -HUP will prompt again.  A new
# certificate can be generated using the genkey(1) command.
-SSLCertificateFile /etc/pki/tls/certs/localhost.crt
+#SSLCertificateFile /etc/pki/tls/certs/localhost.crt
+SSLCertificateFile /etc/pki/tls/private/server.crt
#   Server Private Key:
#   If the key is not combined with the certificate, use this
#   directive to point at the key file.  Keep in mind that if
#   you've both a RSA and a DSA private key you can configure
#   both in parallel (to also allow the use of DSA ciphers, etc.)
-SSLCertificateKeyFile /etc/pki/tls/private/localhost.key
+#SSLCertificateKeyFile /etc/pki/tls/private/localhost.key
+SSLCertificateKeyFile /etc/pki/tls/private/server.key
#   Server Certificate Chain:
#   Point SSLCertificateChainFile at a file containing the
@@ -213,5 +221,11 @@
CustomLog logs/ssl_request_log \
"%t %h %{SSL_PROTOCOL}x %{SSL_CIPHER}x \"%r\" %b"
+<Directory /var/www/simplesaml/www>
+    <IfModule mod_authz_core.c>
+        Require all granted
+    </IfModule>
+</Directory>
+
</VirtualHost>
2. SimpleSAMLphpのダウンロード
SimpleSAMLphpをhttps://simplesamlphp.org/からダウンロードします。本記事執筆の時点では1.19.0が最新ですので、このバージョンを使用します。
ダウンロードしたSimpleSAMPphpを/var/www/simplesamlとして展開します。
[root@idp ~]# ls /var/www/simplesaml/
CONTRIBUTING.md  SECURITY.md   cache          config            docs     log                 package-lock.json  routing    tests
COPYING          TESTING.md    cert           config-templates  extra    metadata            package.json       schemas    vendor
LICENSE          attributemap  composer.json  data              lib      metadata-templates  phpcs.xml          src        webpack.config.js
README.md        bin           composer.lock  dictionaries      locales  modules             phpunit.xml        templates  www
3. Apacheの再起動
Apacheを再起動します。
[root@idp ~]# systemctl restart httpd
4. SimpleSAMLphp設定ページの管理者パスワード設定
/var/www/simplesaml/config/config.phpファイルを編集し、パスワードとsecretsaltを設定します。
secretsaltは設定ファイルのコメントにある通り、下記のコマンドで設定します。
LC_CTYPE=C tr -c -d '0123456789abcdefghijklmnopqrstuvwxyz' /dev/urandom | dd bs=32 count=1 2>/dev/null;echo
config.php )
* A possible way to generate a random salt is by running the following command from a unix shell:
* LC_CTYPE=C tr -c -d '0123456789abcdefghijklmnopqrstuvwxyz' </dev/urandom | dd bs=32 count=1 2>/dev/null;echo
*/
'secretsalt' => 'dvcdn225qhhijwck3608c5mly0az16an',
---省略---
* You can also put a hash here; run "bin/pwgen.php" to generate one.
*/
'auth.adminpassword' => 'xxxxxxxxxxxxxxxxxxxxxx(任意のパスワード)',
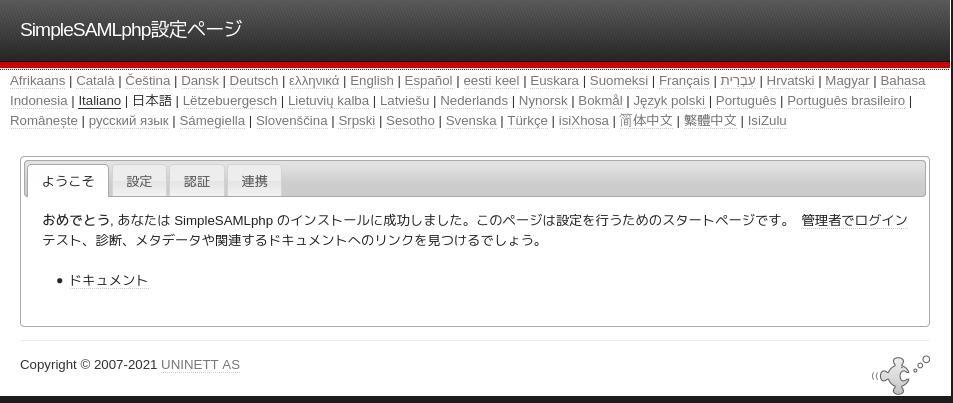
5. SimpleSAMLphp設定ページへのアクセス
https://[host名]/simplesamlにアクセスします。SimpleSAMLphpの設定ページが表示されます。
6. IdPの設定
https://[host名]/simplesamlにアクセスします。SimpleSAMLphpの設定ページが表示されます。
/var/www/simplesaml/config/config.phpファイルを編集し、enable.saml20-idpを”true”に設定します。
*
* Note that shib13-idp has been deprecated and will be removed in SimpleSAMLphp 2.0.
*/
'enable.saml20-idp' => true,
'enable.shib13-idp' => false,
'enable.adfs-idp' => false,
7. 自己証明書の設定
また、自己証明書を/var/www/simplesaml/cert/以下に作成します。
[root@idp ~]# openssl req -newkey rsa:2048 -new -x509 -days 3652 -nodes -subj "/C=JP/ST=SAITAMA/CN=idp.example.com" -out /var/www/simplesaml/cert/idp.example.com -keyout /var/www/simplesaml/cert/idp.example.com
/var/www/simplesaml/metadata/saml20-idp-hosted.phpを編集し、自己証明書を設定します。
'host' => '__DEFAULT__',
// X.509 key and certificate. Relative to the cert directory.
'privatekey' => 'idp.example.com.pem',
'certificate' => 'idp.example.com.crt',
ここまででIdPの設定は完了です。
次回は
次回は、simpleSAMLphpをSPとして設定したWebサイトを用意し、今回設定したIdPとの接続テストを行います。
日々のメモを更新しています。
セキュリティ関係で気になったニュースの備忘録を兼ねたメモを更新しています。個別で情報出せるようになる前の簡単な情報・リンクなんかも載せていきます。